I still remember the day I realized that how to create an even crumb coat was not just about slapping on a layer of frosting and hoping for the best. I was working as a pastry chef in a 3-Michelin-star restaurant, and our head chef would constantly send back our cakes for a redo. It was frustrating, but it taught me that precision is key when it comes to achieving that perfect, pristine finish. The common myth that a crumb coat is just a quick fix before the final layer of frosting is far from the truth. In reality, it’s a crucial step that requires patience, attention to detail, and a deep understanding of the why behind the technique.
As you read this article, you’ll learn the no-nonsense techniques I’ve developed over the years to achieve an even crumb coat every time. I’ll share my personal story of trial and error, and provide you with practical advice on how to overcome common obstacles. You’ll learn how to prepare your cake, choose the right frosting, and apply the perfect amount of pressure to achieve a smooth, even layer. By the end of this article, you’ll be equipped with the knowledge and skills to create a stunning crumb coat that will elevate your cakes to the next level. Whether you’re a beginner or an experienced baker, my goal is to provide you with the honest, straightforward guidance you need to succeed.
Table of Contents
Guide Overview: What You'll Need

Total Time: 1 hour 15 minutes
Estimated Cost: $10 – $20
Difficulty Level: Easy
Tools Required
- Offset Spatula (for smoothing frosting)
- Turntable (optional, for easier access)
- Bench Scraper (for scraping excess frosting)
Supplies & Materials
- Buttercream Frosting
- Cake (fully baked and cooled)
- Parchment Paper (for catching excess frosting)
Step-by-Step Instructions
- 1. First, prepare your cake by ensuring it is completely cooled, as any residual heat can cause the crumb coat to melt or become uneven. I like to let my cakes sit overnight in the fridge to guarantee they’re cold and stable.
- 2. Next, assemble your tools, including a turntable, a large offset spatula, and a bench scraper. Having everything within arm’s reach will save you time and reduce stress during the coating process. Don’t underestimate the importance of a good turntable – it’s a game-changer for achieving an even crumb coat.
- 3. Now, it’s time to make your crumb coat mixture. In a small bowl, whisk together about a cup of buttercream frosting with a tablespoon or two of milk or water until it reaches a smooth, spreadable consistency. Be careful not to add too much liquid, as this can lead to a soggy crumb coat.
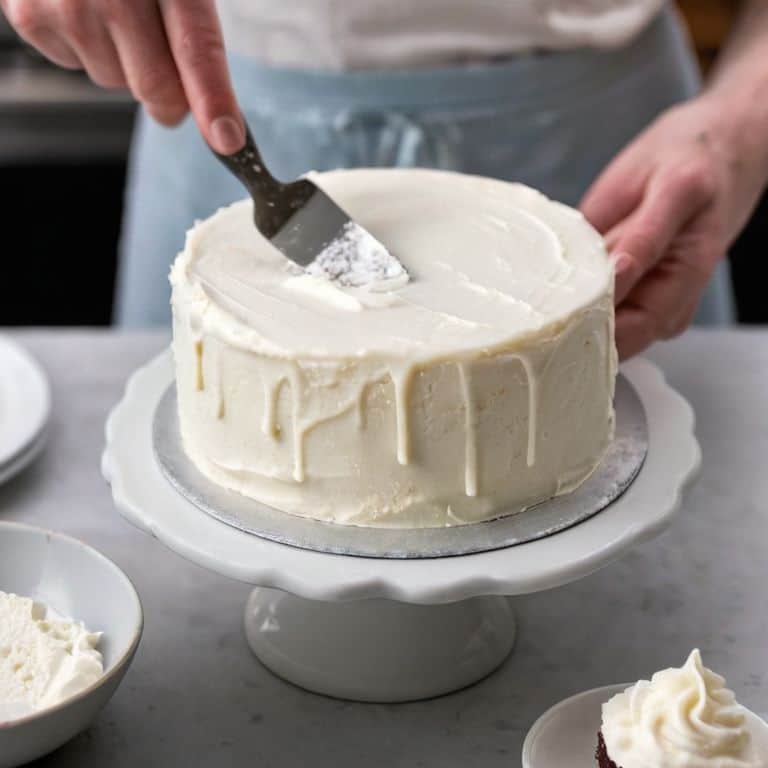
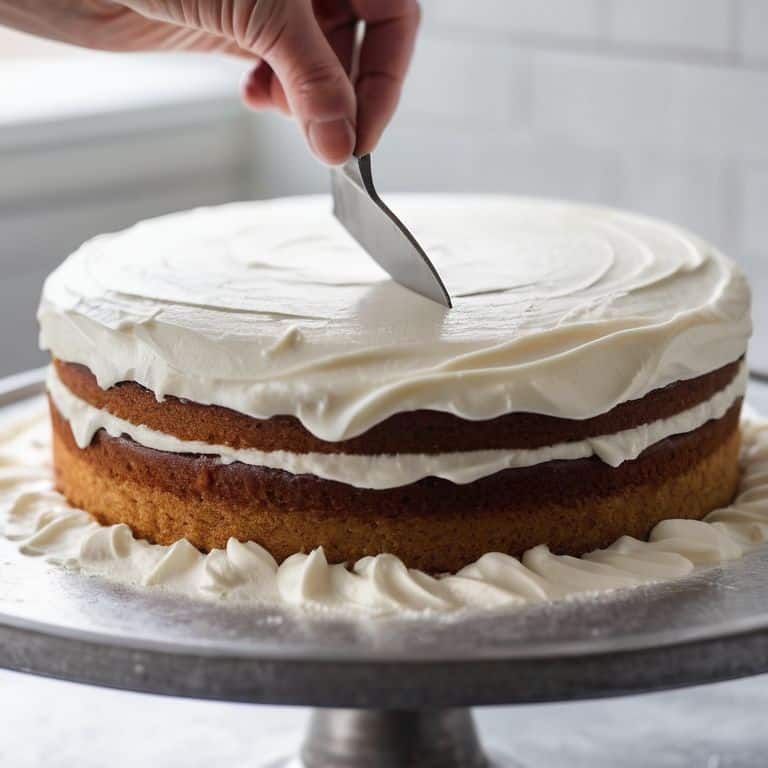
- 4. Place your cake on the turntable and hold the offset spatula in your dominant hand, with the blade facing the cake. Take a small amount of the crumb coat mixture and place it on the top of the cake, spreading it evenly with the spatula to cover the entire surface. Work your way down the sides, using long, smooth strokes to create a uniform layer.
- 5. To ensure the crumb coat adheres evenly, use the bench scraper to gently press the mixture onto the cake, working from the top down. This step is crucial for preventing air pockets from forming, which can lead to an uneven finish.
- 6. Once you’ve applied the crumb coat, use the turntable to spin the cake and inspect it for any bare spots or uneven areas. If necessary, use a small amount of additional mixture to touch up these areas, blending them seamlessly into the surrounding coat. Remember, the key to a perfect crumb coat is patience and attention to detail.
- 7. Allow the crumb coat to set at room temperature for about 10-15 minutes before refrigerating the cake for at least 30 minutes to set the coat completely. This step is essential for creating a stable foundation for your final layer of frosting.
- 8. After the crumb coat has set, remove the cake from the fridge and use a fresh, sharp knife or cake scraper to smooth out any bumps or imperfections. This will give you a flawless surface for applying your final layer of frosting, which is where the magic really happens.
Conquering the Crumb Coat
As I delve deeper into the world of crumb coating, I’ve come to realize that mastering the technique is just the beginning. For beginners, it’s essential to understand the importance of _frosting consistency_ in achieving a smooth cake finish. If the frosting is too thin, it will be difficult to achieve an even coat, while a frosting that’s too thick will be hard to spread evenly. Finding the perfect balance is crucial.
When it comes to applying the crumb coat, I always recommend using a _turntable_ to ensure an even coating. This simple tool allows you to rotate the cake with ease, making it much simpler to access all areas and maintain a consistent layer of frosting. Additionally, it’s essential to be aware of _common crumb coat mistakes to avoid_, such as applying too much frosting or not chilling the cake sufficiently before coating.
By paying attention to these details and practicing regularly, you’ll be well on your way to achieving a pristine crumb coat. It’s worth noting that a well-executed crumb coat can be just as effective as a _fondant covering_ in terms of achieving a smooth finish, and it’s often a more forgiving and accessible option for beginners. With patience and practice, you’ll be able to achieve a beautiful, smooth cake finish that will elevate your baked goods to the next level.
Avoiding Common Mistakes for a Smooth Finish
To achieve a flawless crumb coat, it’s essential to recognize the pitfalls that can lead to a uneven finish. One common mistake is overmixing the frosting, which can result in a dense, rigid layer that’s prone to cracking. Another error is applying the crumb coat at the wrong temperature – if the cake is too warm or the frosting is too cold, it can lead to an uneven application.
I always stress the importance of temperature control in my masterclasses, and it’s crucial here as well. By ensuring your cake and frosting are at the optimal temperatures, you’ll be able to achieve a smooth, even crumb coat that’s the perfect foundation for your final layer of frosting.
Crumb Coat Techniques for Beginners
As a chocolatier and pastry consultant, I’ve seen many beginners struggle with achieving a smooth crumb coat. My advice is to start with a thin layer of frosting or ganache, and then gradually build up to the desired thickness. It’s also essential to work in a cool, dry environment to prevent the frosting from melting or becoming too soft. For those just starting out, I recommend practicing with a simple cake recipe to get a feel for the process.
By mastering the crumb coat, beginners can lay the foundation for more complex decorating techniques. I always say that precision is key, so take your time and don’t be afraid to experiment until you achieve the perfect, even layer. With patience and practice, you’ll be well on your way to creating stunning cakes that rival those of professional pastry chefs.
Mastering the Crumb Coat: 5 Essential Tips for Perfection
- Ensure your cake is completely cooled, as even the slightest warmth can cause the frosting to melt and become uneven
- Use a high-quality frosting that’s specifically designed for crumb coating, and make sure it’s at room temperature for optimal spreadability
- Apply a thin, even layer of frosting to the cake, using a turntable to access all sides and a offset spatula for smooth, sweeping motions
- Chill the cake in the refrigerator for at least 10 minutes to set the crumb coat before adding additional layers of frosting or decorations
- Work in a cool, dry environment to prevent the frosting from softening or becoming too sticky, and use a thermometer to maintain a consistent temperature between 68-72°F (20-22°C) for optimal results
Key Takeaways for a Flawless Crumb Coat
I’ve found that mastering the crumb coat is all about temperature control and the right tool for the job – invest in a good offset spatula, it’s a game-changer
Don’t overmix your crumb coat mixture, and make sure to chill it just enough – you want it to be pliable, not too stiff or too runny, to achieve that perfect, even layer
Practice, practice, practice – the more you work on your crumb coat technique, the better you’ll become at judging the right consistency and application, trust me, it’s worth the effort for that pristine finish
The Secret to Perfection
A flawless crumb coat is not just about technique, it’s about understanding the delicate dance between temperature, texture, and time – master these, and you’ll be rewarded with a finish that’s nothing short of exquisite.
Juliette Le Roux
The Perfect Crumb Coat: A Masterclass Conclusion
In our journey to create an even crumb coat, we’ve covered the essential steps and techniques to achieve a smooth, pristine finish. From preparing the cake to applying the final layer of frosting, it’s clear that attention to detail is paramount. We’ve also explored common mistakes to avoid and provided tips for beginners to overcome the initial hurdles. By mastering the crumb coat, you’ll not only elevate the appearance of your cakes but also develop a strong foundation for more complex decorating techniques.
As you continue to practice and refine your skills, remember that the pursuit of perfection is a never-ending journey. Don’t be discouraged by setbacks or imperfections – instead, use them as opportunities to learn and grow. With dedication and patience, you’ll be able to create breathtaking cakes that impress and delight. So, keep pushing the boundaries of what’s possible, and always strive for that perfect, even crumb coat that will take your baking to the next level.
Frequently Asked Questions
What is the ideal consistency for the crumb coat mixture to ensure it spreads evenly?
For a flawless crumb coat, I aim for a mixture that’s just slightly thicker than mayonnaise. Think of it as a delicate balance – too thin and it pools, too thick and it’s hard to spread. When you lift your spatula, the mixture should hold its shape, but still flow smoothly off the blade. That’s when you know you’ve hit the sweet spot.
How do I prevent the crumb coat from tearing or pulling away from the cake as I apply it?
To prevent the crumb coat from tearing, make sure your cake is completely chilled and your frosting is at room temperature. Apply a thin, even layer, using long, smooth strokes with your offset spatula, and don’t overwork it – this will help the crumb coat adhere evenly and prevent it from pulling away.
Can I use a turntable to help me achieve a smooth, even crumb coat, or is that more of a decorating step?
While a turntable can be a game-changer for decorating, it’s not typically used for applying a crumb coat. Instead, focus on using a offset spatula and a steady hand to achieve a smooth, even layer – that’s where the magic happens, and your cake will thank you.