As I stand in my bespoke cake studio, surrounded by the sweet scent of butter and sugar, I often think about the myth that decorating cupcakes is a task reserved for the pros. But the truth is, mastering how to decorate cupcakes like a pro is within reach for anyone willing to learn the fundamentals. I’ve seen far too many talented bakers held back by the misconception that beautiful cupcake designs require a magic touch or a team of experts. In reality, it’s all about understanding the basics of _cake design_ and practicing with patience and precision.
In this article, I promise to share my honest, no-hype advice on how to decorate cupcakes like a pro. You’ll learn the essential techniques for creating stunning cupcake designs, from the importance of _high-quality ingredients_ to the art of delicate piping and decoration. I’ll guide you through the process, providing you with practical tips and tricks to elevate your baking skills. Whether you’re a beginner or an experienced baker, my goal is to empower you with the knowledge and confidence to create beautiful, professional-looking cupcakes that will impress anyone. So, let’s get started on this sweet journey together!
Table of Contents
Guide Overview: What You'll Need
Total Time: 1 hour 15 minutes
Estimated Cost: $15 – $30
Difficulty Level: Intermediate
Tools Required
- Piping Bag (with various tips)
- Turntable (optional, for displaying)
- Offset Spatula (for smoothing and spreading frosting)
- Measuring Cups (for precise ingredient measurements)
- Electric Mixer (for mixing batter and frosting)
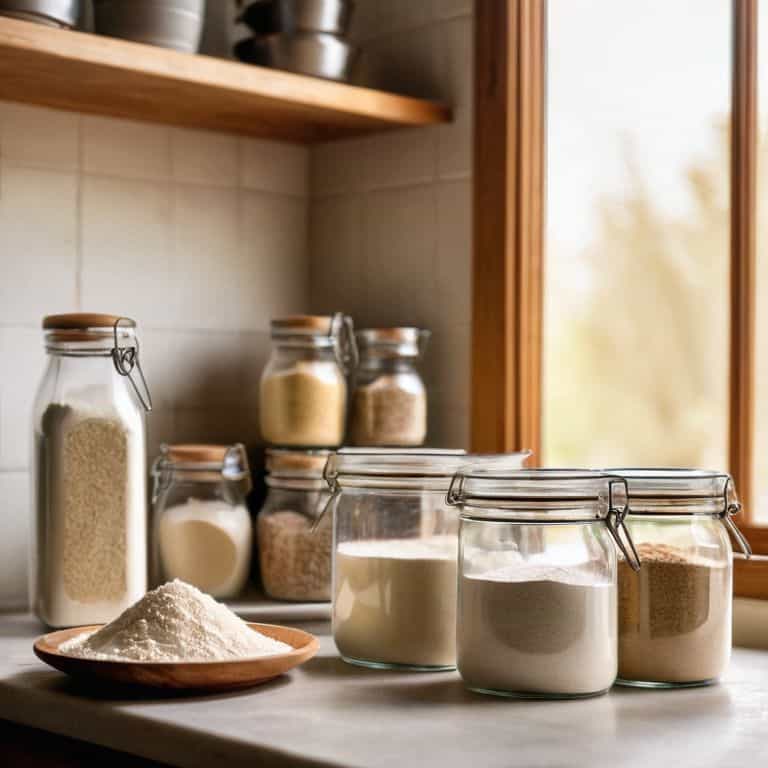
Supplies & Materials
- Cupcakes (baked and cooled)
- Buttercream Frosting (various colors)
- Piping Gel (for intricate designs)
- Edible Decorations (such as sprinkles, candies, or small toys)
- Fondant (for creating custom shapes and designs, 6 inches by 6 inches sheets)
Step-by-Step Instructions
- 1. First, let’s start with the foundation of our decoration: a smooth, even layer of buttercream frosting. To achieve this, make sure your cupcakes are completely cooled, and your frosting is at room temperature. This will ensure that it spreads evenly and doesn’t melt or become too runny. Now, take a small offset spatula or a butter knife and scoop up a generous amount of frosting. Place it on top of the cupcake and gently spread it outwards, making sure to cover the entire surface.
- 2. Next, we’ll be adding a border around the edge of our cupcake. This can be done using a piping bag fitted with a small round tip. Fill the bag with a slightly thicker consistency of frosting than what you used for the base layer. Hold the bag at a 90-degree angle to the cupcake and squeeze out a steady stream of frosting, moving the bag in a continuous motion around the edge of the cupcake. Apply gentle to moderate pressure, depending on the thickness of the border you desire.
- 3. Now, let’s move on to the fun part – adding decorations! For this, you can use a variety of materials such as sprinkles, edible glitter, or small candies. If you’re feeling more adventurous, you can also try making your own decorations using sugar paste or fondant. To apply these decorations, simply place them gently on top of the frosted cupcake, or use a small dab of frosting to adhere them to the surface.
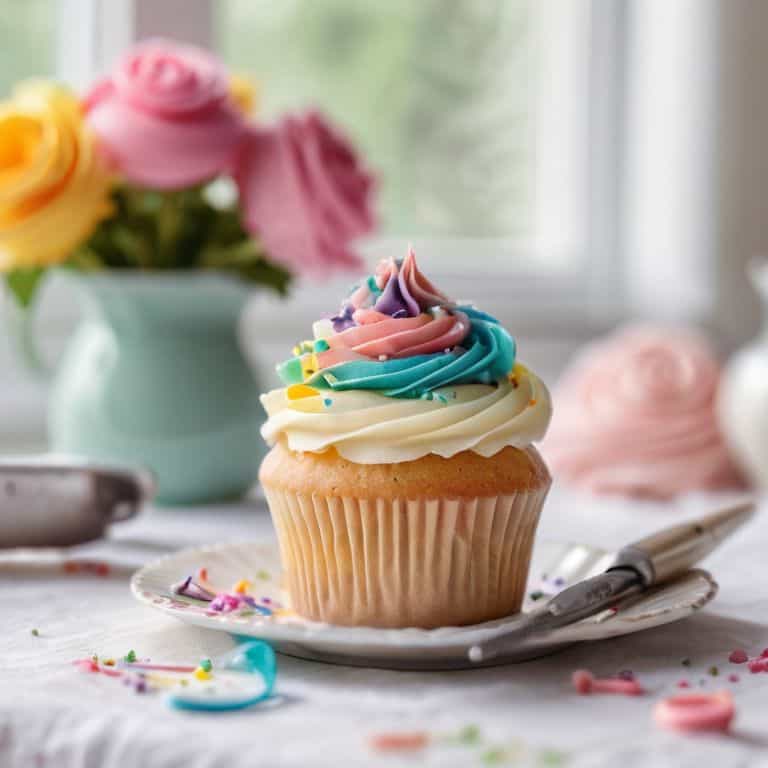
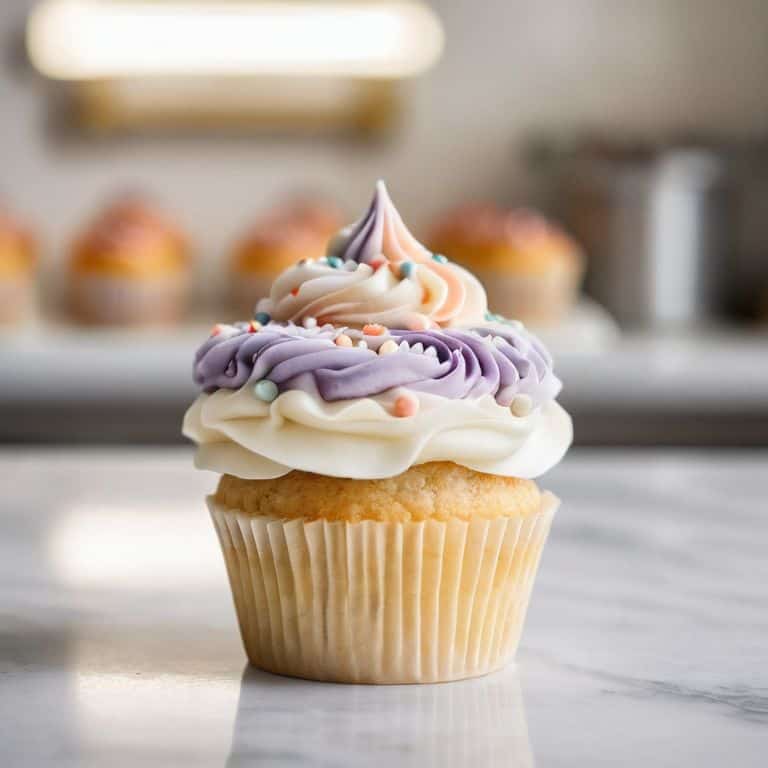
- 4. To add an extra layer of elegance to our cupcake, we’ll be creating a swirl design on top. To do this, fit a piping bag with a large star tip and fill it with a slightly softer consistency of frosting than what you used for the border. Hold the bag directly above the center of the cupcake and squeeze out a small amount of frosting. Then, while still squeezing, move the bag in a circular motion, starting from the center and working your way outwards. Apply gentle pressure at first, increasing it as needed to achieve the desired height and texture.
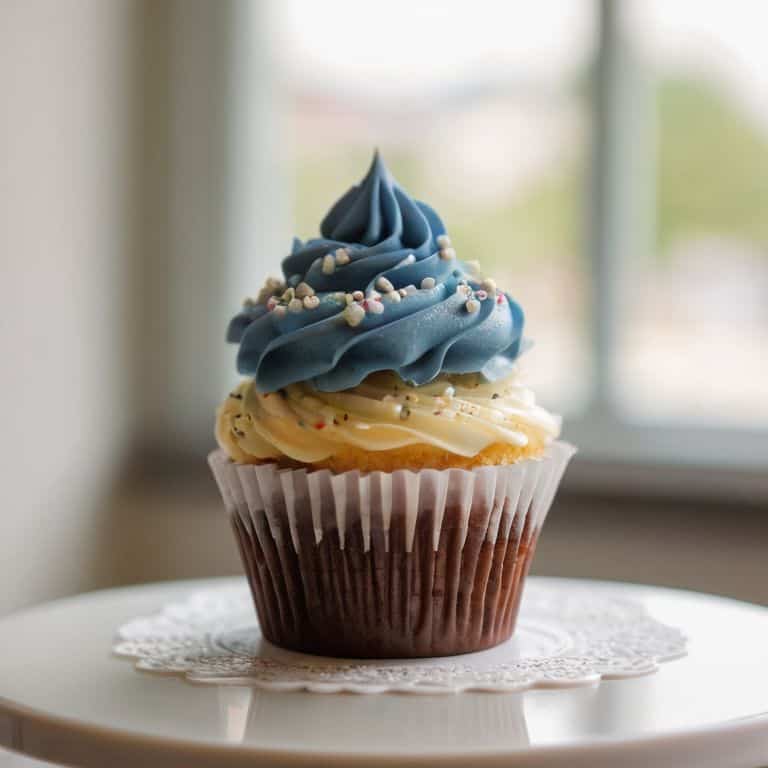
- 5. For a more intricate design, you can try using a piping technique called “striping.” This involves fitting a piping bag with a small round tip and filling it with a thin consistency of frosting in two or more different colors. Hold the bag at a 90-degree angle to the cupcake and squeeze out a thin stream of frosting, moving the bag in a zig-zag pattern across the surface of the cupcake. To create a striped effect, try alternating between different colors as you pipe.
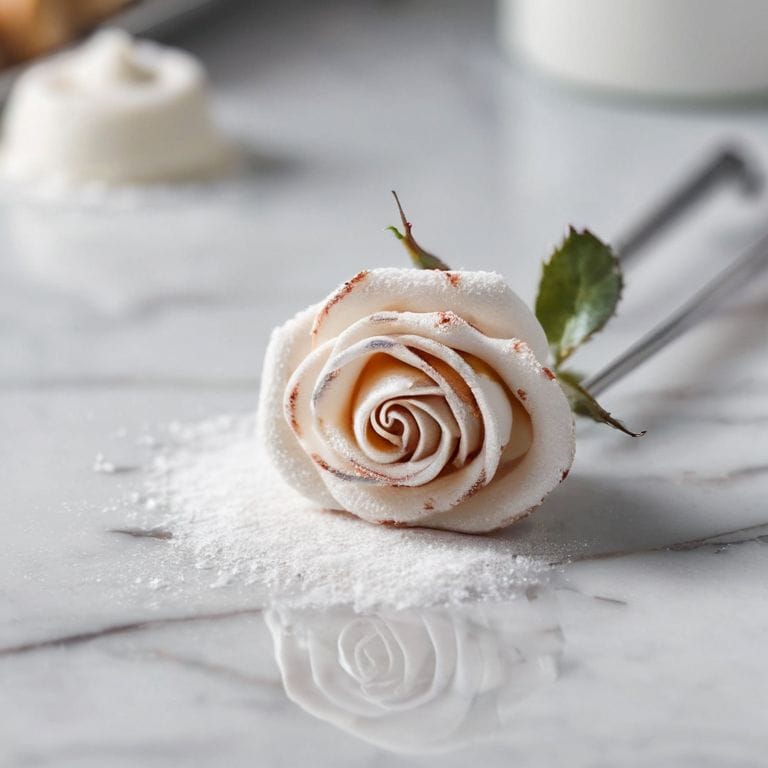
- 6. To add some dimension to our cupcake, let’s try adding a few edible flowers or leaves. These can be made using sugar paste or fondant, and can be colored to match your desired theme or color scheme. To apply the flowers or leaves, use a small dab of frosting to adhere them to the surface of the cupcake. You can place them randomly or in a pattern, depending on the look you’re going for.
- 7. Finally, let’s finish off our cupcake with a dusting of powdered sugar. This will not only add a touch of elegance to our design, but also help to set the frosting and prevent it from becoming too sticky or messy. To dust the cupcake, simply sprinkle a small amount of powdered sugar over the top using a fine-mesh sieve or a small sifter. You can also use a small brush to gently sweep away any excess powder and create a clean, polished look.
How to Decorate Cupcakes Like a Pro
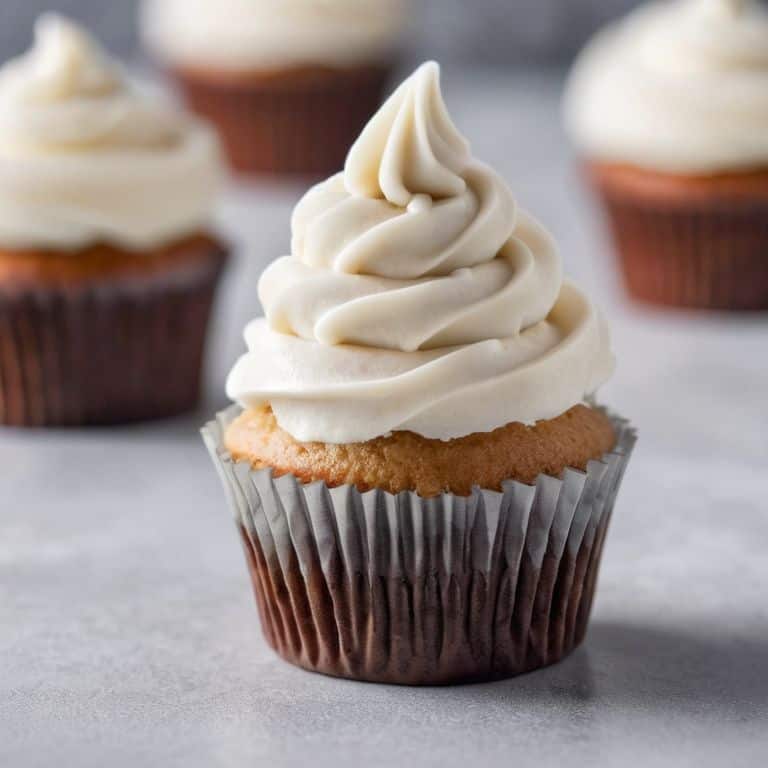
As I always say, the key to elevating your cupcake game lies in the details. When it comes to frosting consistency for piping, it’s essential to get it just right. If it’s too thin, it will be difficult to control, and if it’s too thick, it won’t pipe smoothly. I like to think of it as finding the perfect balance between firm and fluffy.
To take your cupcake decorating to the next level, consider experimenting with color matching for two tone cupcakes. This technique can add a pop of color and visual interest to your designs. You can use edible decorations, such as sprinkles or small candies, to add a fun touch. When it comes to piping bag tips and tricks, I always recommend investing in a good quality piping bag and tips. It will make all the difference in achieving smooth, consistent lines and patterns.
For a professional-looking finish, don’t forget to consider your cupcake display ideas. You can use a decorative stand or tiered server to showcase your creations. This will not only add to the visual appeal but also make it easier to serve and enjoy your beautiful cupcakes. By paying attention to these small details, you’ll be well on your way to creating stunning cupcakes that look like they were made by a pro.
Elevating Designs With Edible Decorations
Now that we’ve mastered the art of frosting consistency, let’s talk about the fun part – adding edible decorations to take our cupcakes to the next level. I adore using delicate sugar flowers, intricately piped borders, and even fresh fruits to add a pop of color and texture. These embellishments not only add visual appeal but also tell a story, making each cupcake a unique piece of edible art.
To get started, experiment with different materials like fondant, gum paste, or even chocolate shavings. Remember, the key to creating stunning designs is balance and restraint – sometimes, less is more. By combining these decorations with our perfectly piped frosting, we’ll create cupcakes that are almost too beautiful to eat. Almost!
Mastering Frosting Consistency for Piping
Mastering Frosting Consistency for Piping
To achieve flawless piped designs, it’s crucial to nail the frosting consistency. I like to think of it as the “goldilocks zone” – not too thin, not too thick. When you’ve reached the perfect balance, your frosting will hold its shape beautifully, allowing you to create intricate details with ease. To get there, start by adjusting the ratio of butter to sugar, and don’t be afraid to add a touch more cream or milk if needed.
By achieving this ideal consistency, you’ll be able to pipe smooth, consistent lines and delicate borders that elevate your cupcakes to a professional level. Remember, practice makes perfect, so don’t be discouraged if it takes a few tries to get it just right – with patience and a bit of tweaking, you’ll be piping like a pro in no time.
The Pro's Toolbox: 5 Essential Tips for Decorating Cupcakes Like a Master
- The Right Frosting for the Job: Understanding the difference between American and Italian meringue buttercreams to choose the perfect one for your design
- Piping Perfection: Investing in high-quality piping bags and tips to ensure smooth, consistent lines and borders
- Color Your World: Experimenting with gel and paste food colorings to achieve vibrant, consistent hues that elevate your designs
- Decorative Details: Using edible decorations like sprinkles, nonpareils, and small candies to add texture and visual interest to your cupcakes
- The Finishing Touches: Mastering the art of writing and drawing on cupcakes with precision and flair, from simple messages to intricate designs
Bringing It All Together: 3 Essential Takeaways
As you master the art of decorating cupcakes like a pro, remember that achieving the perfect frosting consistency is key to effortless piping and beautiful designs
Edible decorations can elevate your cupcake designs from simple to sublime, so don’t be afraid to experiment with different materials and techniques to find your unique style
Practice makes perfect, so keep sketching, baking, and decorating – and most importantly, have fun with the process of creating your own miniature edible masterpieces
The Art of Perfection
To decorate cupcakes like a pro, one must balance creativity with precision, remembering that every delicate detail, from the swirl of frosting to the placement of a single petal, is a brushstroke on the canvas of edible art.
Alison Lawson
The Sweet Finishing Touch
As we conclude our journey to decorating cupcakes like a pro, let’s take a moment to reflect on the key elements that elevate a simple cupcake to a masterpiece. We’ve mastered the art of achieving the perfect frosting consistency for piping, and explored the endless possibilities of using edible decorations to add an extra layer of elegance. By combining these techniques with a dash of creativity and a pinch of patience, you’ll be well on your way to creating cupcakes that are almost too beautiful to eat.
So, as you put down your piping bag and step back to admire your handiwork, remember that the true magic of decorating cupcakes lies not just in the final product, but in the creative process itself. Don’t be afraid to experiment, to try new things, and to make mistakes – for it’s in these moments of imperfection that we often discover our most brilliant ideas, and our passion for baking is truly set ablaze.
Frequently Asked Questions
What are some common mistakes to avoid when piping borders and designs onto cupcakes?
When piping borders and designs, I often see bakers struggle with uneven pressure, resulting in wobbly lines or blobbed details. To avoid this, ensure your frosting is at room temperature and use a light, consistent touch. Practice makes perfect, so don’t be discouraged if your early attempts are a bit shaky – with time, your piping will become smooth and confident.
How can I ensure that my edible decorations, such as fondant or gum paste, adhere properly to the cupcake?
To ensure your edible decorations adhere beautifully, I swear by a tiny dab of water or a specialized edible adhesive. For fondant, a light brush of water is usually sufficient, while gum paste might require a touch more precision. Experiment with gentle pressure and a steady hand – your creations will thank you!
What are some tips for achieving a smooth, even finish when frosting cupcakes, especially for beginners?
For a smooth finish, I swear by the ‘turn-and-scrape’ method: hold your frosted cupcake at an angle, then gently turn and scrape off excess frosting with an offset spatula. Repeat until even, and voilà! A flawless canvas for your edible art.