I still remember the first time I attempted to fill a piping bag for a cake decorating project – it was a disaster! I ended up with buttercream smeared all over my countertop, clothes, and even the cat. It was then that I realized the importance of learning how to fill a piping bag without making a mess. As a cake artist, I’ve had my fair share of struggles with this simple yet crucial step, but over time, I’ve developed a few tricks up my sleeve to make it a breeze. Whether you’re a beginner or an experienced decorator, mastering this technique is essential to creating beautiful, professional-looking cakes.
In this article, I’ll share my personal tips and techniques on how to fill a piping bag without making a mess, so you can avoid the frustration and chaos that I once experienced. You’ll learn how to prepare your piping bag, fill it with ease, and get started on your decorating project without any hassle. My goal is to provide you with practical advice that you can apply immediately, so you can focus on the fun part – creating stunning cakes that will impress your friends and family. By the end of this article, you’ll be confident in your ability to fill a piping bag like a pro, and you’ll be one step closer to creating breathtaking cakes that showcase your skills and creativity.
Table of Contents
Guide Overview: What You'll Need
Total Time: 15 minutes
Estimated Cost: $5 – $10
Difficulty Level: Easy
Tools Required
- Piping Bag 16 inches or larger
- Piping Bag Coupler optional
- Turntable or Flat Surface for stability
Supplies & Materials
- Frosting or Filling of your choice
- Scissors for cutting the piping bag tip
- Wax Paper or Parchment Paper for easy cleanup
Step-by-Step Instructions
- 1. To start, make sure you have all your tools and ingredients ready, including your piping bag, a coupler, and the buttercream or frosting you’ll be using. This will help you stay organized and avoid any last-minute messes.
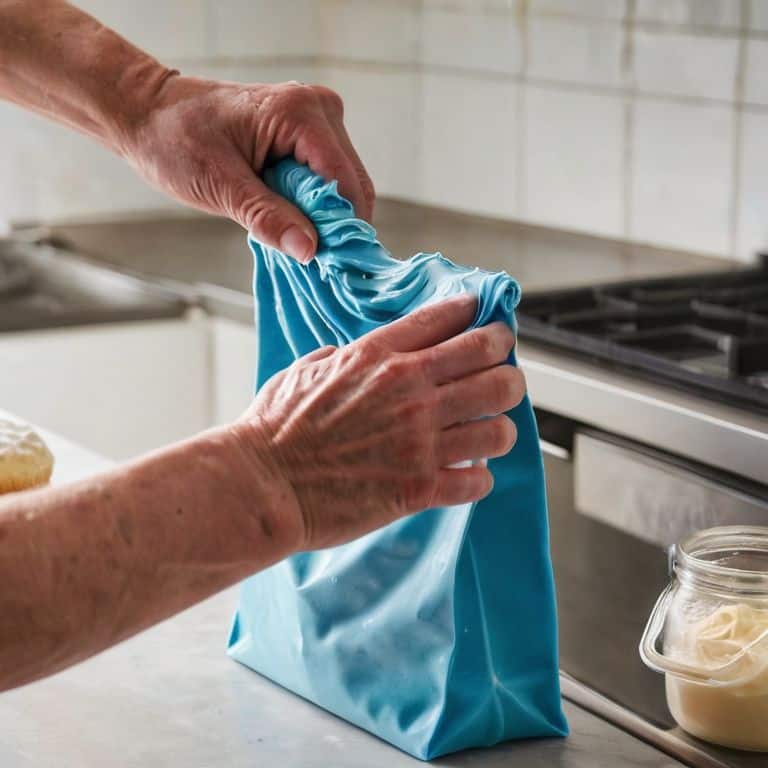
- 2. Next, twist the bottom of the piping bag to create a tight seal, and then push it upwards towards the top of the bag, creating a small pocket. This technique is essential for preventing any filling from escaping, and it’s a trick I like to call the _piping bag twist_.
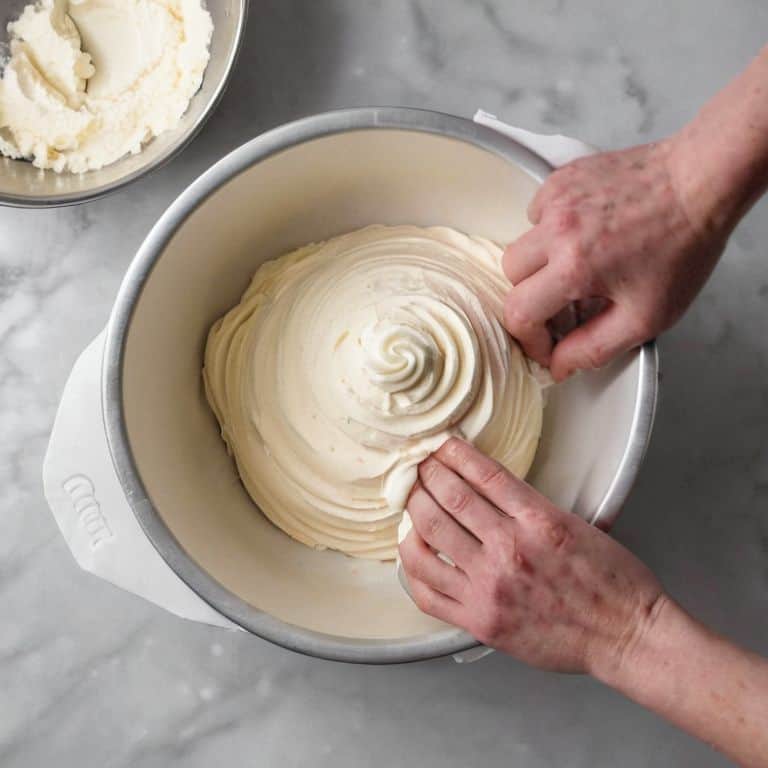
- 3. Now, hold the piping bag over a large bowl or container, and use a spatula to scoop the buttercream or frosting into the bag. Try to fill the bag only about two-thirds full, leaving enough room for the filling to move around without overflowing.
- 4. As you fill the bag, use your non-dominant hand to gently massage the bag, working out any air pockets that may form. This will help eliminate any bubbles and ensure a smooth, even flow of the filling.
- 5. Once the bag is filled, use your dominant hand to twist the top of the bag, creating a secure seal. Make sure it’s tight enough to prevent any filling from escaping, but not so tight that it causes the bag to burst.
- 6. To test the seal, give the bag a gentle squeeze, making sure that no filling comes out. If you notice any leaks, simply twist the top of the bag a bit tighter and try again.
- 7. Finally, use a damp cloth to wipe down the outside of the piping bag, removing any excess filling or smudges. This will help keep your workspace clean and make it easier to handle the bag as you decorate your cake, allowing you to focus on the creative process.
Filling With Finesse
As I always say, filling a piping bag with buttercream is an art that requires patience and finesse. To achieve a smooth, mess-free fill, it’s essential to work in a steady, controlled motion. This means squeezing the buttercream out of the bowl and into the piping bag in a consistent, flowing motion, rather than jerking or tugging on the bag.
When it comes to piping bag techniques for beginners, one of the most common mistakes to avoid is overfilling the bag. This can lead to a big mess, as the buttercream oozes out of the top of the bag and onto your workspace. To avoid this, fill the bag only about two-thirds full, leaving enough room to twist and seal the top without squeezing out any excess buttercream. By doing so, you’ll be able to maneuver the bag with ease, making it simpler to decorate your cake with precision.
For those who are new to easy cake decorating with piping bags, I recommend practicing your filling technique with a small amount of buttercream before moving on to larger projects. This will help you get a feel for the right amount of pressure to apply and how to twist and seal the bag with confidence. With a little practice, you’ll be filling piping bags like a pro and creating beautiful, professional-looking cakes in no time.
Buttercream Bliss Avoiding Common Filling Mistakes
As I always say, the key to a smooth piping bag fill is in the details. One of the most common mistakes I see is overfilling the bag, which can lead to a buttercream blowout – and trust me, it’s not pretty! To avoid this, I like to fill my piping bag about three-quarters of the way full, leaving just enough room to twist and seal the top without putting too much pressure on the buttercream. This simple trick makes all the difference in maintaining a clean and controlled fill.
By taking your time and being mindful of the fill level, you’ll be well on your way to achieving buttercream bliss. Remember, it’s all about finesse, not force – gentle twists and smooth motions will become your best friends in the world of cake decorating.
Piping Bag Techniques for Beginners Made Easy
As a beginner, mastering the art of filling a piping bag can seem daunting, but trust me, it’s all about breaking it down into manageable steps. I always say, it’s not just about getting the buttercream in the bag, it’s about doing it with finesse. To make it easier, start by using a turntable or a non-slip mat to keep your bag steady. This simple trick will give you the confidence to focus on the filling process, rather than worrying about the bag slipping away.
Now, let’s talk about the actual technique. Hold the bag with one hand, and use the other to scoop in your buttercream. Don’t overfill it, darling – you want to leave about an inch at the top for easy twisting and to avoid any messy spills. Remember, practice makes perfect, so don’t be too hard on yourself if it takes a few tries to get the hang of it. With time and patience, you’ll be filling piping bags like a pro, and your cakes will be all the more beautiful for it.
The Art of Mess-Free Filling: 5 Essential Tips
- Prepare Your Piping Bag with Precision: Make sure to choose the right piping bag for your decorating needs and have it ready to go before filling
- Twist and Turn for a Tight Seal: Twist the top of the piping bag to prevent buttercream from escaping, and turn it into a habit for every fill
- Squeeze with Finesse: Apply gentle to moderate pressure when squeezing out buttercream to avoid blowouts and messy cleanups
- Fill to the Right Level: Don’t overfill your piping bag – leave about an inch at the top for easy twisting and turning, and to avoid buttercream explosions
- Clean as You Go: Keep a damp cloth handy to wipe down your workspace and piping bag as you fill, making the whole process smoother and more enjoyable
Mastering the Art of Mess-Free Piping Bag Fills: 3 Key Takeaways
Piping bag preparation is key: ensuring your bag is the right size and that you’re using the correct tip for your decorating needs can save you from a world of mess and stress
Twist and pinch: the simple act of twisting the top of your piping bag and pinching it shut can make all the difference in preventing buttercream or frosting from escaping and making a mess
Practice makes perfect: don’t be too hard on yourself if filling a piping bag doesn’t come naturally at first – with a little patience and practice, you’ll be filling like a pro and creating beautiful, mess-free designs in no time
The Art of Mess-Free Filling
The key to filling a piping bag with finesse is not just about the technique, but about the mindset – it’s about embracing the gentle dance of buttercream and bag, and letting the sweetness of the process guide your hands.
Chloé Dubois
The Art of Mess-Free Filling: A Sweet Conclusion
As we’ve journeyed through the world of piping bag filling, I hope you’ve picked up a few essential techniques to make your cake decorating experience smoother and more enjoyable. From the initial steps of preparing your piping bag to the finesse required for filling it with buttercream, every detail matters. We’ve also explored common mistakes to avoid, ensuring that your creative process remains uninterrupted and fun. By mastering the art of filling a piping bag without making a mess, you’re not just improving your decorating skills; you’re also enhancing the overall aesthetic of your cakes.
As you continue on your cake decorating journey, remember that practice is key, and every mistake is an opportunity to learn and grow. Don’t be afraid to experiment with different techniques and designs – it’s all part of the creative process. With patience, dedication, and a willingness to learn, you can turn any cake into a stunning masterpiece. So, go ahead, fill that piping bag with confidence, and watch your creations come to life in a swirl of color and beauty.
Frequently Asked Questions
What's the best way to prevent buttercream from oozing out of the top of the piping bag while I'm filling it?
To prevent buttercream from oozing out, I twist the top of the piping bag a few times to create a tight seal, then hold it in place with one hand while filling with the other – it’s all about gentle pressure and a steady hand, my friends!
How do I know if I've over- or under-filled my piping bag, and what are the consequences of each?
The sweet spot is all about balance. If your bag is over-filled, you’ll struggle with control and risk messy bursts. Under-filled, and your designs will lack substance. Check your bag’s fill level by gently squeezing – it should feel firm, but not rigid. Aim for about 2/3 full, and you’ll be piping like a pro in no time.
Are there any special tips for filling a piping bag with multiple colors or types of frosting without creating a mess or mixing the colors together?
When working with multiple colors or frostings, I swear by using separate piping bags for each, or utilizing a specialized multi-color piping bag with compartments – it’s a total game-changer for keeping hues distinct and mess at bay!