As I sit amidst my watercolor paintings and half-finished cake designs, I often think about the misconception that creating fondant figures is a daunting task, reserved for the most skilled decorators. But the truth is, learning how to make simple fondant figures can be a fun and rewarding experience, even for beginners. I’ve seen many of my students struggle with the idea that fondant work requires a high level of expertise, but I’m here to tell you that with the right guidance, anyone can create beautiful, delicate figures to adorn their cakes.
In this article, I’ll share my personal approach to making simple fondant figures, from preparing the fondant to adding those delicate, finishing touches. You’ll learn practical tips and easy-to-follow techniques that will give you the confidence to create your own fondant masterpieces. Whether you’re a beginner or an experienced decorator looking to refine your skills, I’ll provide you with honest, no-hype advice on how to bring your fondant figures to life. By the end of this guide, you’ll be equipped with the knowledge and skills to create stunning fondant designs that will elevate your cakes and make them truly unforgettable.
Table of Contents
Guide Overview: What You'll Need
Total Time: 1 hour 15 minutes
Estimated Cost: $10 – $20
Difficulty Level: Easy
Tools Required
- Rolling Pin (for flattening fondant)
- Shaping Tools (e.g., toothpicks, skewers, modeling tools)
- Wax Paper (for working surface)
Supplies & Materials
- Fondant (various colors)
- Gum Paste (optional for details)
- Confectioners Sugar (for dusting surface)
- Shortening (e.g., Crisco, for kneading fondant)
Step-by-Step Instructions
- 1. To start creating your simple fondant figures, gather your tools and materials, including fondant in various colors, a fondant smoother, a ball tool, and a toothpick. It’s essential to have a clean and stable workspace to avoid any contamination of your fondant.
- 2. Next, condition your fondant by kneading it until it becomes pliable and easy to work with. This step is crucial as it will help you achieve a smooth and even texture for your figures. Remember to knead each color of fondant separately to prevent color bleeding.
- 3. Now, let’s create the basic shape of our figure. Take a small amount of fondant and roll it into a ball using your palms. Then, use your fingers to shape it into a more defined form, such as a body or a head. Pay attention to proportions to ensure your figure looks balanced and natural.
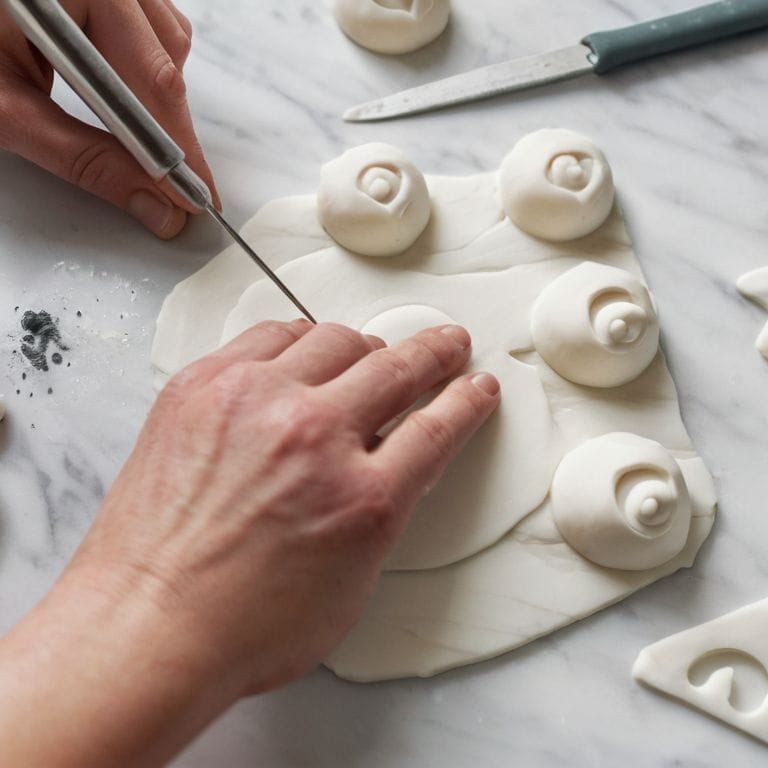
- 4. To add details to your figure, use a toothpick to create texture and patterns. Gently poke the toothpick into the fondant to create small indents or lines, depending on the design you’re aiming for. For example, you can create eyes, a mouth, or even clothing details using this technique.
- 5. Once you have the basic shape and details in place, it’s time to refine your figure. Use a fondant smoother to smooth out any imperfections and achieve a smooth finish. This will help your figure look more polished and professional.
- 6. To add limbs or other extensions to your figure, use a small amount of fondant and shape it into the desired form. Attach it to the main body using a dab of water or a small amount of fondant adhesive. Make sure the attachment is secure to prevent the limb from falling off.
- 7. Finally, bring your figure to life by adding a few final details, such as a small hat or accessories. Use a ball tool to create small indents or curves, and a toothpick to add any last-minute details and embellishments. With these final touches, your simple fondant figure is now complete and ready to adorn your cake or pastry.
Mastering Simple Fondant Figures

As I delve into the world of fondant molding techniques, I’m reminded that practice makes perfect. To truly master the art of fondant, one must be willing to experiment and try new things. For instance, when working with simple fondant animal designs, it’s essential to pay attention to the smallest details, from the shape of the eyes to the texture of the fur.
When it comes to bringing your fondant creations to life, having the right cake decorating tools for beginners can make all the difference. A good set of tools can help you achieve smooth, even shapes and intricate details that will take your cakes to the next level. I also like to keep a fondant color mixing guide on hand to ensure that my colors are always consistent and vibrant.
To add a finishing touch to your fondant figures, consider using edible glue for fondant to attach small details like eyes or accessories. With a little patience and practice, you’ll be creating beautiful, intricate designs in no time. Remember to focus on fondant shaping tips, like using gentle pressure and smooth motions to achieve the desired shape, and don’t be afraid to get creative and try new things.
Fondant Color Mixing Guide for Realistic Designs
To achieve realistic designs, mastering fondant color mixing is essential. I like to think of it as painting with butter and sugar. By combining different shades, you can create a wide range of hues that bring your fondant figures to life. For skin tones, I often mix a touch of pink with a hint of yellow, while for foliage, I blend various greens to capture the nuances of nature.
When mixing colors, remember that a little goes a long way. Start with small increments and build up gradually, as it’s easier to add more color than it is to remove excess. I also like to test my colors on a small, inconspicuous area first to ensure the desired shade is achieved. With practice, you’ll develop an eye for the perfect blend, and your fondant figures will take on a wonderfully realistic appearance.
Fondant Molding Techniques for Beginners
As we delve deeper into the world of fondant figures, it’s essential to explore various molding techniques that can elevate your designs. For beginners, I recommend starting with simple tools like toothpicks, modeling tools, or even household items like skewers or cookie cutters. These can help you achieve intricate details and textures, adding depth and character to your figures.
By experimenting with different molding techniques, you’ll discover how to create subtle expressions, delicate limbs, and intricate accessories. Remember, practice makes perfect, so don’t be afraid to try new things and make mistakes – they often lead to unexpected, beautiful results. With patience and creativity, you’ll master the art of fondant molding, unlocking a world of possibilities for your cake designs.
Bringing Fondant Figures to Life: 5 Essential Tips
- Start with a solid foundation: ensure your fondant is at the right consistency, not too sticky or too dry, for effortless molding
- Keep it simple, yet detailed: focus on one or two key features of your figure, like the eyes or the mouth, to add character without overwhelming yourself
- Experiment with texture: add depth and realism to your figures by incorporating different textures, such as smooth, ridged, or patterned fondant
- Pay attention to scale: make sure your figures are in proportion to the cake and other decorations to create a visually appealing display
- Don’t be too hard on yourself: remember that imperfections can add charm to your fondant figures, and it’s okay to make mistakes – they’re all part of the learning process
Key Takeaways for Crafting Simple Fondant Figures
By mastering basic fondant molding techniques, you can create a wide range of figures to adorn your cakes, from simple shapes to intricate designs, elevating your baked goods into true works of art
With the right fondant color mixing guide, you can achieve realistic hues that bring your figures to life, making them a perfect addition to any themed cake or dessert, and allowing you to express your creativity through sugar and color
Remember, practice and patience are key to perfecting your fondant figure-making skills – don’t be discouraged if your first attempts don’t turn out as expected, but instead, use them as an opportunity to learn and refine your technique, just as I do with my watercolor painting and cake decorating journey
The Art of Fondant Figures
As I always say, the simplest fondant figures hold the greatest beauty, for it’s in the subtle details and gentle touches that we find the true essence of sugarcraft.
Chloé Dubois
Bringing Your Fondant Creations to Life

As we conclude our journey into the world of simple fondant figures, remember that the key to mastering these adorable decorations lies in practicing patience and _attention to detail_. We’ve covered the essential steps to create your own fondant figures, from preparing the fondant to bringing your designs to life with color and texture. By following the fondant molding techniques and color mixing guide, you’ve gained the skills to create realistic and beautiful designs that will elevate your cakes and pastries to the next level. Whether you’re a beginner or an experienced decorator, the art of creating fondant figures is all about experimentation and having fun with the process.
As you continue to explore the world of fondant decorating, keep in mind that the possibilities are endless, and your imagination is the only limit. Don’t be afraid to try new things, make mistakes, and learn from them. With time and practice, you’ll develop your own unique style and voice in the world of cake decorating, and your fondant figures will become a reflection of your creativity and passion. So, go ahead, get creative, and make those fondant figures shine – your next masterpiece is just a roll of fondant away!
Frequently Asked Questions
What are some common mistakes to avoid when molding fondant figures to ensure they look smooth and even?
When molding fondant figures, I’ve found that common mistakes to avoid include overworking the fondant, which can lead to stretch marks and uneven textures, and not allowing the fondant to rest, causing it to become too soft and prone to sagging. Gentle handling and patience are key to achieving smooth, even results.
How can I achieve realistic skin tones and colors for my fondant figures using the fondant color mixing guide?
To achieve realistic skin tones, I recommend mixing a base of ivory or cream fondant with subtle additions of peach, pink, or brown. Experiment with tiny increments, blending until you reach your desired hue. Remember, it’s all about nuance – a little goes a long way in creating authentic, lifelike colors for your fondant figures.
What tools or equipment are essential for creating intricate details and textures on simple fondant figures?
To add those exquisite details, I swear by my trusty toolkit, which includes a fondant smoother, modeling tools, and a texture mat. These essentials help me achieve realistic textures and intricate designs on my fondant figures, from delicate petals to subtle skin textures.