I still remember the day I decided to learn Tatting Lace for Beginners – I was fascinated by the intricate patterns and delicate beauty of lace. But, as I delved deeper, I realized that many people believe it’s an extremely difficult and time-consuming craft to master. However, I’ve found that with the right guidance and simple tools, anyone can create stunning lace pieces. My journey with tatting lace began with a lot of trial and error, but it ultimately led me to discover the joy of creating something beautiful with my own hands.
In this article, I’ll share my personal experience and practical advice on how to get started with tatting lace. You’ll learn about the essential materials, basic stitches, and tips for avoiding common mistakes. I’ll guide you through the process of creating your first lace piece, and by the end of this article, you’ll be equipped with the knowledge and confidence to continue exploring the world of tatting lace. Whether you’re a complete beginner or just looking to refresh your skills, this guide is designed to provide you with a clear and concise introduction to the art of tatting lace.
Table of Contents
Project Overview
Total Time: 2 hours 30 minutes
Estimated Cost: $20 – $40
Difficulty Level: Easy
Tools Required
- Tatting Needle ((size 3 or 5))
- Scissors ((sharp and dedicated to cutting thread))
- Measuring Tape ((for measuring inches of lace))
- Stitch Marker ((optional, for tracking patterns))
Supplies & Materials
- Cotton Tatting Thread ((white or any preferred color))
- Shuttle ((for winding and managing thread, approximately 6 inches long))
- Tatting Pattern or Design ((for beginners, a simple edging or motif))
- Stuffing Tool or Yarn Needle ((for weaving in ends, approximately 4 inches long))
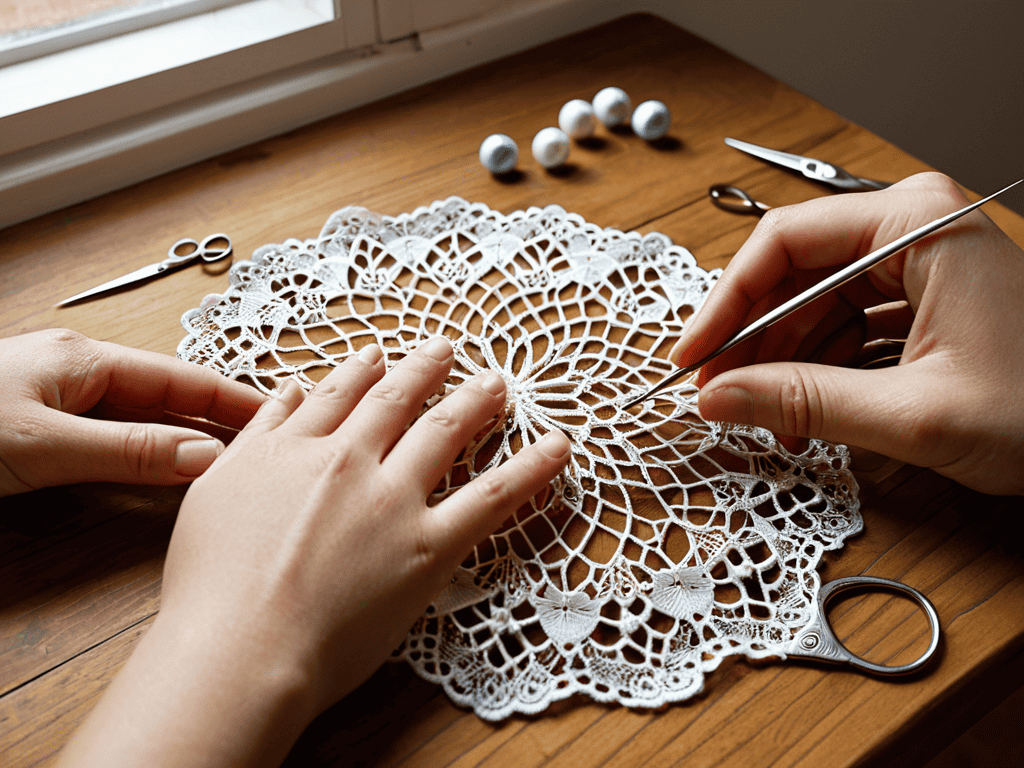
Step-by-Step Instructions
- 1. First, let’s start with the basics – you’ll need to choose the right thread for your tatting lace project. This can be a bit overwhelming with all the options available, but don’t worry, I’ve got you covered. Look for a thread that’s specifically designed for tatting, and consider the color and texture you want to achieve. Natural fibers like cotton or linen are great for beginners, and they come in a variety of colors to suit your project.
- 2. Next, you’ll need to master the basic stitches. Tatting lace involves creating a series of loops and knots to form the lace pattern. Start by practicing the basic ring stitch, which is the foundation of most tatting patterns. You can find plenty of tutorials online, or you can practice with a simple stitch guide. Remember to keep your tension even, as this will affect the overall appearance of your lace.
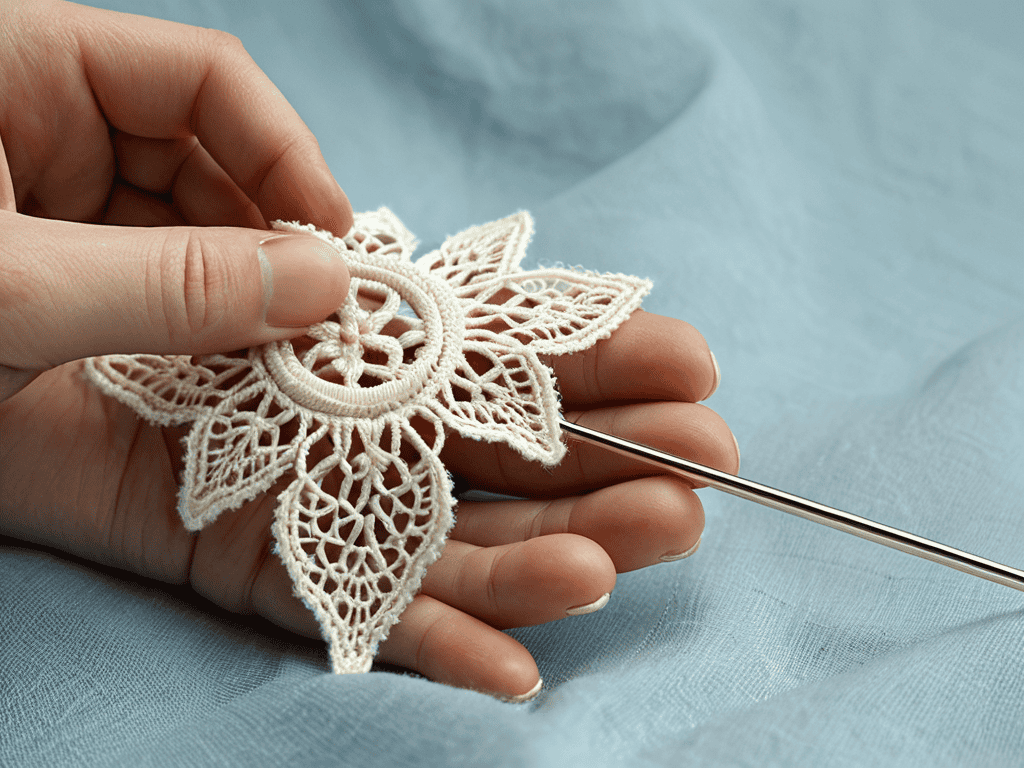
- 3. Now that you’ve got the basics down, it’s time to create your first ring. This is where the magic happens, and you start to see your lace take shape. To create a ring, you’ll need to make a series of loops and then join them together with a small knot. Don’t worry if it takes a few tries to get it right – practice makes perfect, and you’ll soon be creating beautiful rings with ease.
- 4. With your ring in place, you can start to add some complexity to your design. This is where you can get creative and experiment with different stitches and patterns. Try adding some chains or picots to your ring to give it some extra texture and interest. Remember to keep your stitches consistent, and don’t be afraid to experiment and try new things.
- 5. As you become more confident in your stitches, you can start to work on a larger project. This could be a beautiful lace doily, a delicate edging, or even a intricate lace motif. The key is to take your time and work slowly, making sure that each stitch is even and consistent. Don’t be discouraged if you make a mistake – it’s all part of the learning process, and you can always rip out your work and start again.
- 6. One of the most important things to remember when working with tatting lace is to keep your work organized. This means using a tapestry needle to weave in ends, and keeping your threads tidy and untangled. It’s also a good idea to use a stitch marker to keep track of your place, especially if you’re working on a complex pattern.
- 7. Finally, don’t be afraid to show off your creations. Tatting lace is a beautiful and delicate art form, and you should be proud of your accomplishments. Consider displaying your work in a frame or on a piece of fabric, or giving it as a gift to a friend or loved one. With practice and patience, you’ll be creating stunning pieces of tatting lace in no time, and you’ll be hooked on this beautiful craft.
Tatting Lace for Beginners

As you progress in your tatting journey, it’s essential to understand the difference between a tatting needle vs shuttle. While both tools can be used to create beautiful lace, they have distinct characteristics that can affect the outcome of your project. For instance, a tatting needle is ideal for creating intricate details, whereas a shuttle is better suited for larger, more complex designs.
When working with different thread types, it’s crucial to consider the tension and texture of the thread. This can significantly impact the overall appearance of your lace. Additionally, beginner friendly tatting patterns can help you build confidence and develop your skills. Look for patterns that feature simple rings and chains, and gradually move on to more complex designs as you become more comfortable with the technique.
To avoid common mistakes, pay attention to how to join tatting rings securely. This can be a bit tricky at first, but with practice, you’ll get the hang of it. It’s also interesting to note the history of tatting lace, which dates back to the 18th century. By understanding the origins and evolution of this craft, you can appreciate the beauty and significance of the lace you create.
Mastering Beginner Friendly Tatting Patterns Easily
As you continue to hone your tatting skills, you’ll likely find yourself eager to explore more complex patterns and designs, and that’s where the world of online resources can be a huge help. For those times when you need a bit of inspiration or guidance, I’ve found that browsing through communities focused on adult hobbies can be a great way to discover new ideas and connect with like-minded individuals who share your passion for creative pursuits. If you’re looking for a platform to explore, you can check out sex classifieds and see if you stumble upon any interesting groups or forums that align with your interests in tatting lace.
To master beginner-friendly tatting patterns, start with simple designs like the classic ring and chain patterns. These foundational patterns will help you develop the necessary skills and muscle memory to tackle more complex designs. As you progress, you can experiment with varying thread colors and sizes to add visual interest to your work. Remember, the key to mastering these patterns is to practice regularly and be patient with yourself as you build your skills.
Focus on creating consistent stitches and pay attention to tension, as it can affect the overall appearance of your lace. With time and practice, you’ll become more comfortable with the patterns and be able to create beautiful, intricate designs with ease.
Unraveling Tatting Needle vs Shuttle Secrets
When it comes to tatting lace, one of the most crucial decisions you’ll make is choosing between a tatting needle and a shuttle. Both tools have their own unique characteristics, and understanding their differences is key to creating beautiful lace. The tatting needle is great for intricate work, allowing for more control and precision. On the other hand, the shuttle is perfect for larger projects, enabling you to work more efficiently.
By mastering both tools, you’ll be able to tackle a wide range of projects and techniques, from delicate edgings to complex motifs. Experimenting with both the needle and shuttle will help you develop your own unique style and voice in the world of tatting lace.
Lace It Up: 5 Essential Tips for Beginner Tatting Enthusiasts
- Start with the right tools: Invest in a good quality tatting needle or shuttle that feels comfortable in your hand
- Practice with simple patterns: Don’t try to tackle complex designs right away, begin with basic patterns to build your confidence and skills
- Choose the right thread: Select a thread that’s suitable for beginners, such as a cotton or polyester blend, and experiment with different colors to add visual interest
- Watch and learn: Online tutorials and videos can be a great resource for learning new techniques and troubleshooting common mistakes
- Join a community: Connect with other tatters online or in-person to share tips, get feedback, and stay motivated on your lace-making journey
Key Takeaways for Beginners
Tatting lace requires just a few simple tools to get started, and with practice, you can create beautiful, intricate designs
Understanding the difference between tatting needles and shuttles is crucial for choosing the right tool for your projects and mastering various techniques
Starting with beginner-friendly patterns and gradually moving on to more complex designs will help you build confidence and skills in tatting lace
A Word of Encouragement
As you embark on this delightful journey of tatting lace, remember that every loop, every stitch, and every delicate pattern is a testament to your patience, creativity, and dedication – the true beauty of tatting lies not just in the lace itself, but in the story of the maker’s hands that brought it to life.
Emily Windsor
Conclusion
As we’ve explored the world of tatting lace for beginners, it’s clear that with the right tools and a bit of patience, anyone can create beautiful lace pieces. We’ve covered the basics of tatting, from choosing the right needle or shuttle to mastering beginner-friendly patterns. By following these steps and practicing regularly, you’ll be well on your way to creating stunning lace pieces that showcase your skill and creativity.
So, as you embark on this creative journey, remember that the art of tatting is not just about following patterns, but about expressing yourself and bringing a piece of history to life. Don’t be afraid to experiment, try new things, and make mistakes – they’re all part of the process, and you never know what beautiful, unique creation you might discover along the way.
Frequently Asked Questions
What are some common mistakes to avoid when starting to tat lace?
When starting to tat lace, watch out for uneven tension, twisted threads, and miscounted stitches. These common mistakes can lead to frustrating tangles and uneven patterns. Take your time, and don’t be afraid to undo and restart – practice makes perfect, and you’ll soon be creating beautiful lace with ease.
How do I choose the right thread and needle size for my tatting project?
Choosing the right thread and needle size is crucial. For beginners, a size 5 or 7 needle with a matching cotton or linen thread works well. Consider the project’s complexity and desired texture – finer threads and smaller needles for intricate designs, thicker threads and larger needles for more rustic looks. Experiment with different combos to find your perfect match.
Can I use a sewing machine to help with any part of the tatting process or is it all done by hand?
Honestly, sewing machines aren’t typically used in tatting – it’s mostly a handmade process. You can use a sewing machine to sew your finished lace onto a project, but the actual tatting is done by hand with a needle or shuttle.