I still remember the day I had to transport a delicate, five-tiered masterpiece to a wedding venue – it was a nerve-wracking experience, to say the least. The thought of how to transport a tiered cake safely had kept me up all night, imagining all the possible disasters that could befall my edible work of art. As a cake artist, I’ve learned that it’s not just about creating a stunning design, but also about ensuring it arrives at its destination in one piece. The reality is, transporting a tiered cake can be a daunting task, but with the right techniques and mindset, it can be a breeze.
In this article, I’ll share my personal tips and tricks on how to transport a tiered cake safely, from preparation to arrival. You’ll learn how to properly secure your cake, choose the right transportation equipment, and handle any unexpected situations that may arise. My goal is to give you the confidence to transport your own tiered cake creations without worrying about them toppling over or getting damaged. By the end of this guide, you’ll be equipped with the knowledge to ensure your cakes arrive at their destination looking as stunning as they did when they left your kitchen.
Table of Contents
Guide Overview: What You'll Need
Total Time: 1 hour 15 minutes
Estimated Cost: $10 – $30
Difficulty Level: Intermediate
Tools Required
- Cake Box (sturdy, specifically designed for tiered cakes)
- Non-Slip Mat (to place under the cake box)
- Straps or Bungee Cords (to secure the cake box in the vehicle)
- Level (to ensure the cake is perfectly level during transport)
Supplies & Materials
- Cake Stabilizer Kits (including dowel rods and cake boards)
- Bubble Wrap or Foam Inserts (for extra protection around the cake box)
- Tape (strong, to secure any parts of the cake or packaging)
- Thermally Insulated Bag (optional, for maintaining a consistent temperature)
Step-by-Step Instructions
- 1. First, let’s talk about preparation – it’s essential to make sure your tiered cake is completely set and stable before you even think about moving it. This means allowing the buttercream or fondant to set for at least 24 hours, and making sure all the tiers are securely stacked and dowelled. I like to use a turntable to display my cakes while they’re setting, so I can easily check that everything is even and sturdy.
- 2. Next, you’ll need to invest in a good quality cake transport box – these are specifically designed to keep your cake safe and secure during transit. Look for one that’s sturdy, well-ventilated, and has plenty of room for your cake to sit comfortably without touching the sides. I swear by my trusty cake box, which has been with me through countless deliveries and has never let me down.
- 3. Now it’s time to think about support and stability – you’ll need to make sure your cake is properly secured within the transport box. I use foam inserts or cake cushions to keep my cake snug and prevent it from shifting around during transit. You can also use non-slip mats or grips to keep the cake from sliding around on the box’s surface.
- 4. When it comes to actually placing the cake in the transport box, I like to use a gentle rocking motion to ease it in. This helps prevent any bumps or jolts that could dislodge the tiers or damage the cake. Take your time, and don’t be afraid to get a friend to help you if you need an extra pair of hands.
- 5. With your cake safely in the transport box, it’s time to think about securing the box itself. I use strong tape or straps to keep the box closed and prevent it from opening during transit. You should also consider labelling the box with clear instructions, such as “Fragile” or “This Side Up”, to alert anyone handling the box to take extra care.
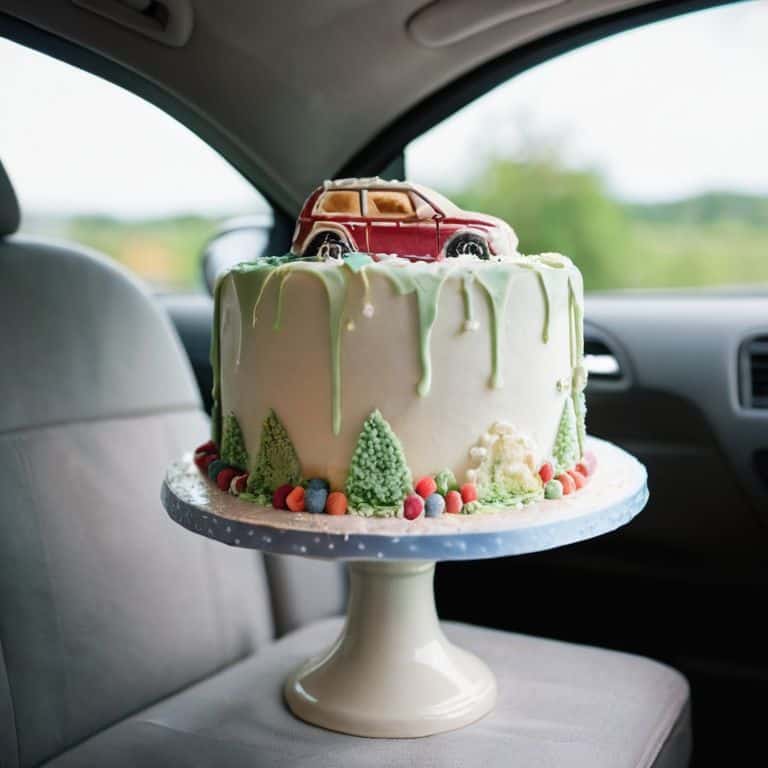
- 6. Now, let’s talk about transporting the cake – this is often the most nerve-wracking part of the process, but with the right precautions, you can minimize the risk of accidents. I always transport my cakes in the back seat of my car, where they’re less likely to be jostled or exposed to extreme temperatures. You should also avoid sudden stops or sharp turns, and consider having a friend ride with you to help keep an eye on the cake.
- 7. Finally, when you arrive at your destination, take a deep breath and carefully remove the cake from the transport box. I like to use a cake stand or turntable to display my cake, and make any final adjustments to the decoration or placement before presenting it to my client. Remember to take your time, and don’t rush the process – with patience and care, you’ll be able to deliver a stunning, intact tiered cake that’s sure to wow your audience.
Mastering Tiered Cake Transport
As I always say, mastering the art of transportation is just as crucial as perfecting your cake design. When it comes to tiered cake stabilization methods, I swear by using a combination of dowels and non-slip mats to keep each tier secure. This not only prevents the cakes from shifting during transport but also reduces the risk of cake vibration, which can be detrimental to your masterpiece.
To ensure a stress_free_cake_transportation experience, it’s essential to prepare your cake delivery vehicle in advance. This includes lining the boot or back seat with a non-slip surface and having a custom cake boxing solution in place. I like to use a sturdy, specially designed cake box that can be secured to the seat or floor to prevent any movement during transit.
By incorporating these safe cake handling techniques into your routine, you’ll be able to deliver your tiered cake to its destination with confidence. Remember, reducing cake vibration during transport is key to preventing damage, so take your time and drive smoothly. With a little practice and patience, you’ll be a pro at transporting your tiered cakes in no time, and your clients will appreciate the extra care you take to ensure their cake arrives looking flawless.
Safe Delivery in Style
As I always say, the final leg of the journey is just as crucial as the first. When it comes to safe delivery in style, I like to think of it as the grand finale of our cake’s big debut. To ensure your masterpiece arrives at its destination looking flawless, consider enlisting a trusted helper to assist with the transport. This extra pair of hands can be a lifesaver, allowing you to focus on keeping your cake steady and secure. Plus, having someone to share the excitement with makes the experience even more special.
By taking a few extra precautions and being mindful of your cake’s journey, you’ll be able to deliver it with confidence and poise. Remember, the key to a successful delivery is to stay calm, drive carefully, and keep your cake level and secure. With these tips in mind, you’ll be well on your way to presenting your stunning tiered cake in all its glory, and making a lasting impression on your friends and family.
Stabilizing Towers With Ease
To stabilize those gorgeous towers, I swear by a few simple yet effective techniques. First, make sure your cake boards are securely attached to the serving plate or cake stand. I like to use a dab of royal icing or piping gel to keep everything in place. Next, consider using internal supports like dowels or cake pillars to add extra stability to the tiers. These can be hidden from view with clever decorating, so don’t worry about them ruining your design. With these supports in place, you’ll be amazed at how confidently your cake will stand tall.
By taking the time to stabilize your tiers, you’ll be free to focus on the fun part – decorating! Whether you’re working with sugar flowers, fondant, or buttercream, a stable base is essential for creating a truly show-stopping design.
Tiered Cake Transport Hacks: 5 Essential Tips
- Plan Your Route: Before you even think about moving your cake, consider the route you’ll take – avoid bumpy roads, construction zones, and anything that might put your masterpiece at risk
- Box It Up: Invest in a sturdy, specifically designed cake box that will keep your tiered cake safe from dust, debris, and any accidental bumps along the way
- Chill Out: Keep your cake cool and calm by storing it in the refrigerator until the last possible moment – a cooler cake is a more stable cake, trust me!
- Secure Your Stands: Make sure each tier is securely attached to its stand, and that the stands themselves are stable and won’t topple over during transport – it’s all about balance, my friends
- Drive Defensively: When transporting your cake, drive slowly and smoothly, avoiding sudden turns or brakes – think of your cake as a precious, edible passenger that needs to arrive at its destination in one piece
Key Takeaways for Safely Transporting Your Tiered Cake
Plan ahead by investing in the right equipment, such as a sturdy cake box and non-slip mat, to ensure your masterpiece arrives at its destination intact and looking fabulous
Execute a smooth delivery by driving carefully, avoiding sudden movements, and having a trusted assistant to help with the transportation process, if possible
Add a personal touch to your cake’s grand arrival by styling the presentation, including the cake stand and surrounding decorations, to make a lasting impression on your guests
The Art of Safe Transport
A tiered cake is not just a dessert, it’s a masterpiece on the move – handle it with the care you would a precious work of art, and it will arrive at its destination as breathtaking as it is delicious.
Chloé Dubois
The Sweet Taste of Success
As we conclude our journey on how to transport a tiered cake safely, let’s take a moment to recap the essentials. From stabilizing towers with ease to ensuring safe delivery in style, we’ve covered it all. Remember, the key to a successful cake transport lies in the details – a sturdy base, a smooth ride, and a gentle touch. By mastering these techniques, you’ll be well on your way to delivering your tiered masterpieces with confidence and poise.
So, the next time you’re about to send your edible work of art off to its destination, take a deep breath and trust in your abilities. With practice and patience, you’ll become a pro at transporting tiered cakes, and your creations will be the talk of the town. Keep pushing the boundaries of what’s possible with sugar and buttercream, and never forget to have fun along the way. Happy decorating, and I’ll see you in the next tutorial!
Frequently Asked Questions
What if I don't have a cake box or a dedicated cake transport vehicle, are there any alternative methods to keep my tiered cake safe?
No cake box or dedicated vehicle, no problem. I’ve been there too. You can use a large, sturdy cardboard box or even a plastic storage container. Just make sure it’s clean and dry. Add some non-slip mats or paper towels to prevent slipping, and you’re good to go. It’s not glamorous, but it works like a charm.
How do I prevent the tiers from shifting or toppling over during transport, especially on uneven or bumpy roads?
To prevent tiers from shifting, I swear by non-slip mats and sturdy cake boards. For extra security, I also use cake dowels and a turntable in my vehicle to minimize movement. On bumpy roads, I take it slow and steady, ensuring my masterpiece arrives intact and looking stunning.
Are there any specific types of cake stands or turntables that are designed for safe transport, and if so, what features should I look for?
When it comes to transporting tiered cakes, I swear by cake stands with non-slip bases and secure latches. Look for turntables with a low center of gravity and a smooth, locking mechanism to prevent rotation during transit. These features will give you peace of mind and protect your masterpiece.