I still remember the first time I attempted to make a drip cake – it was a disaster. The drips were uneven, the colors didn’t quite match, and the whole thing looked more like a messy experiment than a work of art. But I was determined to master the technique, and after countless trials and errors, I finally got it just right. If you’re struggling to achieve that perfect, smooth drip effect, you’re not alone. Learning how to make a drip cake that’s truly show-stopping can be a daunting task, but I’m here to guide you through it.
In this article, I’ll share my honest, no-fuss advice on how to make a drip cake that’s sure to impress. You’ll learn the secrets to creating a stunning, professional-looking drip effect, from preparing the perfect cake base to mastering the art of smooth, even drips. I’ll walk you through each step, sharing my own tips and tricks for avoiding common mistakes and achieving a truly breathtaking finish. By the end of this guide, you’ll have the confidence and skills to create your own stunning drip cake, and I just can’t wait to see what you’ll create.
Table of Contents
Guide Overview: What You'll Need
Total Time: 2 hours 30 minutes
Estimated Cost: $50 – $100
Difficulty Level: Intermediate
Tools Required
- Mixing Bowls (stainless steel or glass)
- Electric Mixer (stand or handheld)
- Measuring Cups (dry and liquid)
- Measuring Spoons
- Rubber Spatula
- Piping Bag (with round tip)
- Cake Turntable (optional)
- Oven (preheated to 350 degrees Fahrenheit)
Supplies & Materials
- Cake Mix (or ingredients for homemade cake batter)
- Butter (unsalted, 1 cup)
- Milk (1 cup)
- Eggs (2-3)
- Confectioners Sugar (1 cup)
- Fondant or Buttercream (for decoration)
- Food Coloring (optional)
- Chocolate Chips or Candy Melts (for drip effect, 1 cup)
Step-by-Step Instructions
- 1. To start creating your stunning drip cake, begin by preparing your cake layers. This involves baking your favorite cake recipe and allowing the layers to cool completely. I like to use a classic vanilla or chocolate recipe, but feel free to get creative with your flavors. Once your layers are cool, you can start to level them to ensure they’re even and ready for stacking.
- 2. Next, it’s time to make your buttercream frosting. This will be the foundation of your drip cake, so make sure to get the consistency just right. I like to use a combination of powdered sugar, butter, and a touch of milk or cream to achieve a smooth and creamy texture. You can also add a few drops of food coloring to match your desired color scheme.
- 3. Now it’s time to assemble your cake layers. Place a small amount of buttercream on your serving plate or cake stand, and then add your first cake layer. Spread a thin layer of buttercream on top of the cake, and then repeat this process with your remaining cake layers. Make sure to align your layers carefully to ensure your cake is even and stable.
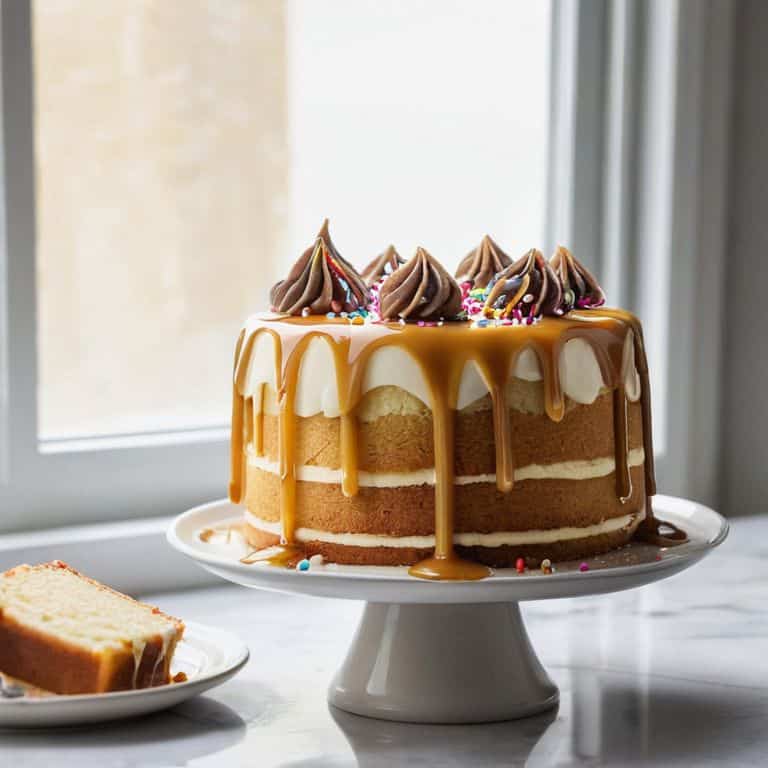
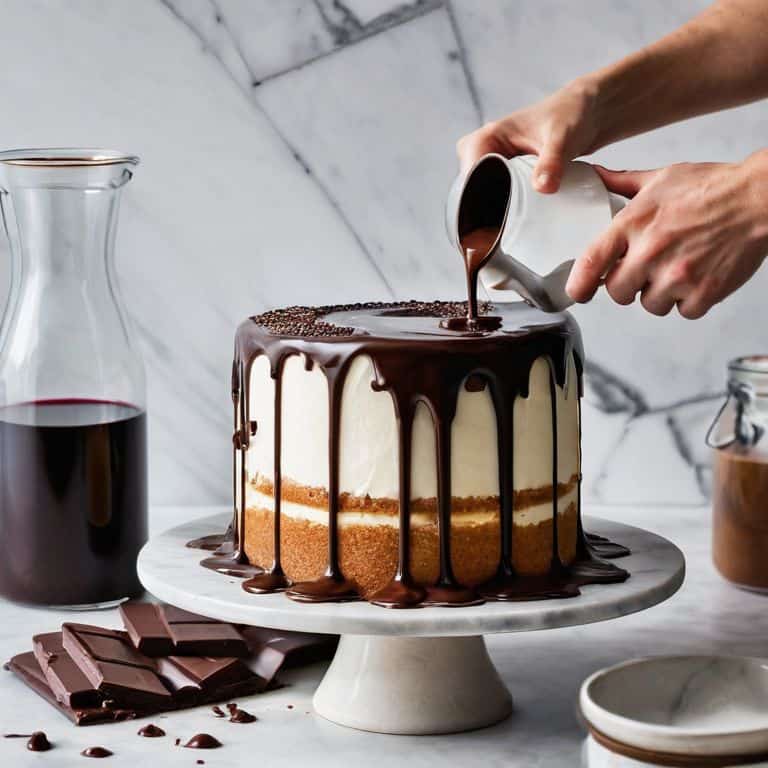
- 4. With your cake layers stacked, it’s time to add the drip effect. To do this, you’ll need to make a thin consistency chocolate glaze. You can use melted chocolate, heavy cream, or a combination of the two to achieve the right consistency. I like to use a high-quality dark chocolate for a rich and decadent flavor.
- 5. To apply the drip effect, simply pour the chocolate glaze over the top of your cake, allowing it to drip down the sides. You can use a spoon or piping bag to control the flow of the glaze and achieve the desired pattern. I like to experiment with different drip patterns to add some visual interest to my cake.
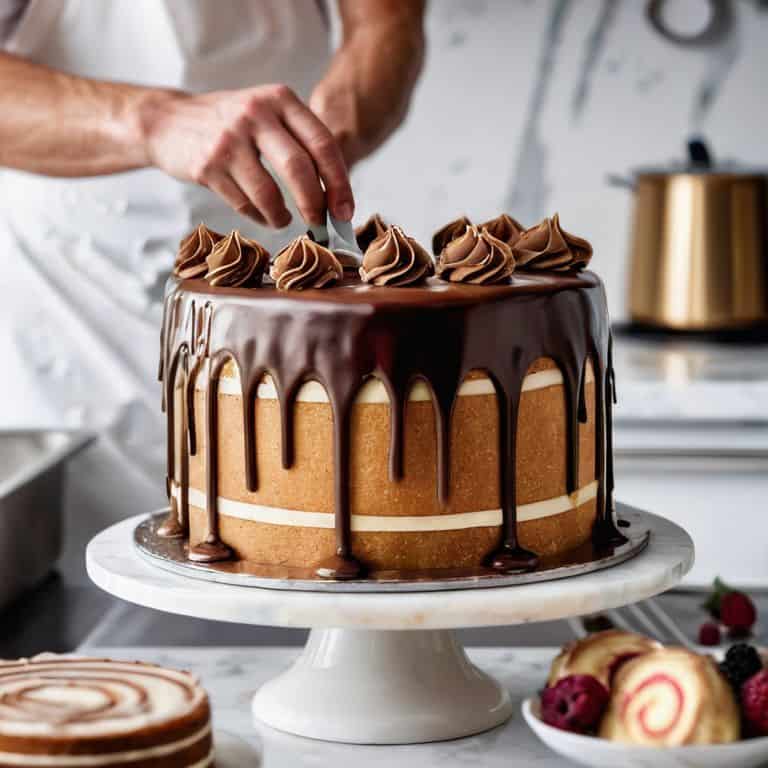
- 6. Once your glaze has set, you can add any additional decorations you like. I’m a big fan of fresh flowers or edible gold dust to add a touch of elegance to my cakes. You can also use sprinkles, candies, or other toppings to match your theme or color scheme.
- 7. Finally, it’s time to display your masterpiece. Choose a beautiful cake stand or serving plate that complements your cake’s colors and design. I like to add a few decorative elements, such as greenery or ribbons, to complete the look. With your drip cake now complete, you can step back and admire your handiwork – and get ready to impress your friends and family with your culinary artistry.
Mastering Drip Cake Art
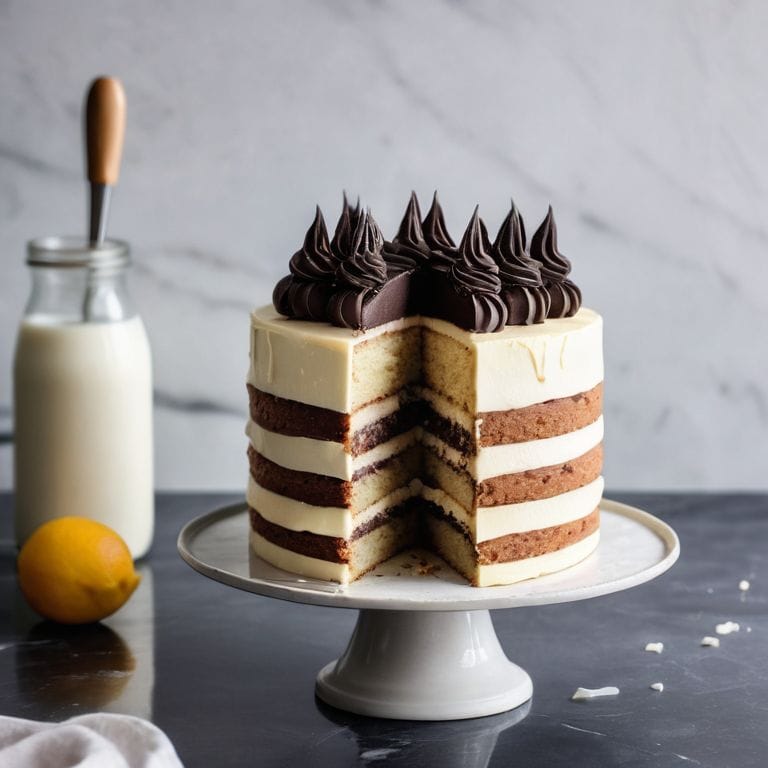
As I delve into the world of drip cake decorating techniques, I’m reminded of the importance of layer cake assembly tips. A sturdy foundation is essential for a stunning drip cake, and this is where many beginners go wrong. To avoid a wobbly or uneven cake, make sure to level and stack your layers carefully, using a small amount of buttercream or ganache to hold them in place.
When it comes to adding the drip effect, I like to use a chocolate ganache recipe for cakes that’s rich and velvety. This not only tastes amazing but also provides a beautiful, smooth finish. To achieve the perfect drip, experiment with different temperatures and consistency of your ganache. Colorful cake design inspiration can be found in nature, art, or even fashion trends, so don’t be afraid to think outside the box and try new combinations.
For a truly show-stopping drip cake, consider your cake leveling and stacking methods as well as your drip cake styling ideas. A well-placed garnish or decorative element can make all the difference, adding a touch of elegance and sophistication to your design. Whether you’re a beginner or an experienced cake decorator, remember to have fun and experiment with different techniques and styles to find what works best for you.
Chocolate Ganache Recipe for Cakes Revealed
To elevate your drip cake to new heights, a rich, velvety chocolate ganache is essential. I adore making my own ganache from scratch, as it allows me to control the depth of flavor and texture. My go-to recipe combines high-quality dark chocolate, heavy cream, and a touch of unsalted butter. By gently heating the mixture and whisking until smooth, you’ll achieve a luxurious ganache perfect for drizzling over your cake.
This chocolate ganache recipe is a game-changer for any cake decorator. Not only does it add an intense, chocolatey flavor, but its smooth consistency also makes it a dream to work with. I love experimenting with different types of chocolate to create unique flavor profiles, from classic dark to creamy white. By mastering this simple yet decadent recipe, you’ll be able to take your drip cakes to the next level and impress your friends and family with your culinary artistry.
Drip Cake Decorating Techniques Unveiled
As we dive deeper into the world of drip cake art, it’s essential to experiment with various decorating techniques. I love playing with different drizzle patterns, from delicate, lacy designs to bold, geometric shapes. One of my favorite tricks is to use a toothpick or skewer to create intricate, swirling patterns on the cake’s surface. This adds a touch of whimsy and visual interest to the overall design.
To take your drip cake to the next level, consider adding some decorative elements, such as fresh flowers, greenery, or even edible gold dust. These small details can make a significant impact on the overall aesthetic of your cake, elevating it from a delicious treat to a true work of art. Remember, the key to mastering drip cake decorating is to have fun and be creative – don’t be afraid to try new things and see what works best for you!
Elevating Your Drip Cake Game: 5 Essential Tips to Try
- Choose the Right Cake: Select a cake recipe that yields a moist and sturdy crumb, as this will provide the perfect base for your drip cake design
- Temperature Control is Key: Ensure your chocolate ganache has reached the ideal temperature for dripping, as this will affect the flow and overall appearance of your design
- Don’t Overmix the Ganache: Mix your chocolate and cream just until combined, as overmixing can lead to a thick and uncooperative ganache
- Experiment with Colors: Add a pop of color to your drip cake by using food-grade dyes or colored chocolate, and don’t be afraid to get creative with ombre effects and marbling
- Practice Makes Perfect: Don’t be discouraged if your first few attempts at creating a drip cake don’t turn out as expected – keep practicing and you’ll soon develop the skills and confidence to create stunning, professional-looking drip cakes
Key Takeaways for Creating a Stunning Drip Cake
Remember, the key to a flawless drip cake is in the temperature and consistency of your chocolate ganache – it should be warm but not hot, and thin enough to flow smoothly off a spoon
Experimenting with different cake stand styles and heights can dramatically change the visual impact of your finished drip cake, so don’t be afraid to get creative with your presentation
Practice makes perfect, especially when it comes to mastering the drip effect itself – don’t be discouraged if your first few attempts don’t turn out as expected, and have fun with the process of refining your technique
The Art of Drip Cake Perfection
As I always say, the true magic of a drip cake lies not in the recipe, but in the gentle dance of chocolate and cream, where every deliberate drip and delicate drizzle tells a story of patience, passion, and the pursuit of sweetness.
Chloé Dubois
Bringing Your Drip Cake Vision to Life
As we conclude our journey through the world of drip cakes, let’s take a moment to reflect on the key elements that make these creations truly special. From the initial preparation of your cake layers to the masterful pouring of the chocolate ganache, each step plays a vital role in the final masterpiece. Remember, the art of making a drip cake is not just about following a recipe, but about understanding the nuances of texture, color, and presentation. By embracing this process and experimenting with different techniques, you’ll find that your baking skills will flourish, and your creations will become the centerpiece of any gathering.
As you embark on your own drip cake adventures, I encourage you to view each cake as a blank canvas, waiting for your personal touch and creative expression. Don’t be afraid to try new things, to push the boundaries of what’s possible with sugar and chocolate. With patience, practice, and a willingness to learn, you’ll find that the world of cake decorating opens up to you in ways you never thought possible. So go ahead, get creative, and make every cake a reflection of your unique style and flair – your friends, family, and taste buds will thank you!
Frequently Asked Questions
What type of chocolate is best to use for the ganache in a drip cake?
For a rich, velvety ganache, I adore using high-quality dark chocolate with at least 70% cocoa solids. The deeper flavor profile complements the sweetness of the cake perfectly, and its smooth texture is ideal for achieving those gorgeous, flowing drips.
How do I achieve a smooth and even drip effect on the sides of the cake?
To achieve a smooth and even drip effect, I recommend using a high-quality chocolate ganache that’s been warmed to the perfect consistency. Hold the cake at an angle and gently pour the ganache, allowing it to flow naturally down the sides. You can also use a spatula or spoon to guide the flow for a more controlled look.
Can I color the chocolate ganache to match a specific theme or design for my drip cake?
Absolutely, you can color your chocolate ganache to match your theme. I love adding a hint of color to make my drip cakes truly unique. Simply add a few drops of high-quality food coloring to your ganache and mix well. Remember, a little goes a long way, so start with a small amount and adjust to achieve the perfect hue.